Wednesday 23 December 2020

CREATIVE // Hama Bead Snowflakes

Perfect Christmas Holiday Activity For Crafty Kids

Day number one of the Christmas holiday and you can bet that the kids are desperate for a bit of school routine. It is always funny, I find it takes days for them to get out of the routine of school and productivity meaning that they spend a good chunk of the early morning asking "what are we doing today?"

Our house is always full of things that have been made by the kids. One activity that they absolutely love, especially Raphael, is Hama Beads, the plastic beads that you iron together. Now PINTEREST is absolutely awash with Hama ideas and the kids love browsing through, but one really simple one that caught my eye were some cute snowflake decorations. Having recently refilled the bead box we got out our hexagon bead plates and made up a few of our own.


They are pretty self explanatory once you have seen a few images of the shapes. I wouldn't say there are instructions to follow, just get creative with some white beads and design your own.

If you don't know the Hama process here is a little info:
Hama beads are plastic which you arrange on a peg board in all sorts of patterns and then iron to melt the beads together solidifying the pattern.


For us, this is a nice way to pass the time quickly, we just get a bit lost in doing it and once you sit down you find an hour just disappears and it's just really nice. 
Anyway, if you are a fan of making paper snowflakes you might enjoy this delicate alternative which would be perfect for adding to special parcels, hanging on the tree or using to decorate windowsills and tables during this festive period.


Have a go yourself, these are a great craft to enjoy with kids or just with friends, with really satisfying results.


SHARE:

MIND // Good Books & Podcasts That Have My Head Where It Is Today

A Reading List To Help Change Your Negative Thoughts

My own personal battle with mental health isn't something I have shyed away from on this blog. But with life ever changing it's not something that I always talk about. My path has been ever changing and how I deal with things also has. This year however I had my eyes opened to different ways of thinking from some really interesting reads and I really wanted to share them. This is the most books I have read, or in fact listened to in years so that kinda shows that they have really changed me, but every book made me want to go onto more. 

It's not a huge list and honestly, nearly all of these books have not been physically read, they have, in fact, been listened to which I not only prefer but makes me connect so much more with the author. Most of my audio books have been read by the writer and the experience of listening to them tell their stories has been really interesting. Not only do you hear a book read how it was intended, there is an element that makes you feel like you are listening to a friend. 

Some of the books I own and have gone back to for reference. Some I have not finished simply because I found inspiration and moved on and some have been written in such a way that it is easy to dip in and out. Altogether though these books have really brought new thought processes into my life and I have really enjoyed listening to them and taking them as an education to help me in my life. 

This list includes podcasts as I have really got into listening to them on walks or more recently, when painting the house!

Books

Oprah Winfrey // What I know For Sure

Marianne Williamson // A Return To Love

Brene Brown // The Gifts Of Imperfection

Earling Kragg // Silence In An Age Of Noise

Judith Valante  // How To Live

Oprah Winfrey // The Wisdom Of Sundays

Podcasts 

The Good Glow by Georgie Crawford (Start with season one)

Super Soul Conversations by Oprah Winfrey

Unlocking Us by Brene Brown

The Father Mike Schmitz Catholic Podcast by Fr. Mike Schmitz

Books I have now to help develop prayer and meditation

The Bible In One Year : I started this this year and listened to it religiously on the school run until lock down hit and I could never get back into it. I will be doing it again though as I really found it engaging. There is an app which gives you the daily lesson so download that over buying the book if you like to listen to things.

Twenty Four Hours A Day; A tool for AA practice. Used as a tool to aid alcoholics. Some of this makes no sense to my life but the prayers and meditations for each day are excellent for all walks of life.

God Calling, By Two Listeners: a daily devotional to be read cover to cover or picked up when necessary. It helps to find inspiration for spiritual enrichment.

The Website: 'Be A Heart Designs' had an email sign up to a 40 day positivity fest. with catholic spirituality at the heart but any Christian will enjoy. The 40 days of emails to meditate on are lovely.

I wanted to share these as they have made a difference to how my whole year has been constructed, especially the latter part. What is nice is that for me, all these thoughts were already floating around my life, it just took some spoken words to help my brain engage  with them. Feel free to have a read. my first step to it all was the first season of Georgie Crawford's 'The Good Glow' podcast. Enjoy.

SHARE:

Tuesday 22 December 2020

FOOD // Messy Mince Pies

 Messy mince pies to whip up in minutes 


I used to always think that being a mum who bakes the goodies is a great skill to have. I have learned that it takes time, hard work and, actually, energy that I didn't have, so slowly I just began to stop. In more recent years I have 100% opted into buying pre-made parts to enable me to quickly make satisfying treats. Pastry is one of those products that I simple couldn't get into making. "It's so easy though" says everybody, but for me it's not about that: I don't have the time to devote to the prep., making, letting sit process that then allows me to bake a pastry treat. For me, I just remove all of that with buying ready roll off the shelf and popping it straight into the freezer so it is good to go when I need it. I think having pastry in the freezer is a great basic to always carry. We use it to top pies that are made with the bare minimum or just for sweet pastries when bread is low. 
Anyway, Rob found an old jar of mince meat (I'm hoping it was only from last year) and gave me the eyes of "Bonus Emily, you can whip up some homemade mince pies (Insert smiley face)".


Obviously, knowing there was pastry ready to roll in the freezer I agreed happily, got it out to defrost and prepped for making up some homemade mince pies.


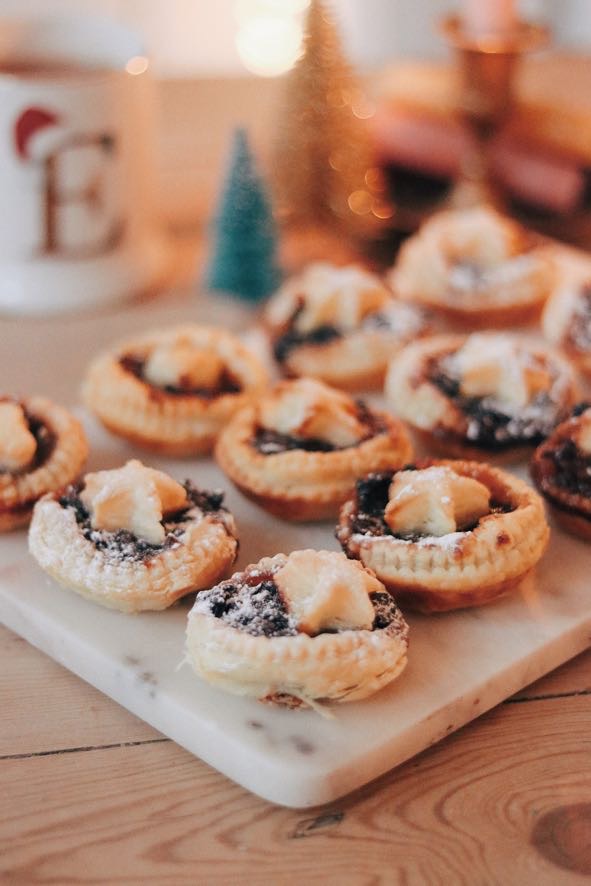
However, I defrosted puff pastry and not shortcrust which I didn't even think about, but also, I prefer so I can see why that one came out. Knowing that these were going to be puffier than usual meant that I had to accept that they were going to be a bit messy so it was time to embrace the idea of cosy, warming, fresh Christmas foods rather than star-baker-pastry-chef-extraordinaire styled up mince pies. Honest truth though, food is food, and homemade food, even if it is thrown together from jars or out the freezer is still effort and is such a good way to use time in your day. I love pre-prepared ingredients!

My technique for my super quick, messy mince pies:

Cut out bases; I love a crinkle cutter.
Place in a greased cupcake tray; I used fry light spray.
Spoon mincemeat filling into each pastry dish.
Top with a lid; I just cut a smaller pastry star to sit on top.
Spray with fry light or brush with a beaten egg to allow to go golden brown when baking.

All of the above was truly just whipped together and during baking mincemeat sure did pour out of them. They are gloriously sticky and golden and a real delicious treat to have on the table ready for the family arrival from school and work.


Fresh out the oven

Best way to serve and eat these tasty treats is warmed, doused in icing sugar with a hot cup of tea and if possible sat in front of a fire or with your back to a radiator. The heat makes the taste experience grow tenfold and it truly warms the soul.


SHARE:

Friday 11 December 2020

FOOD // Chocolate Button Pretzels

 The easiest and most delicious treat 


I have wanted to make these for so long and this past week was the perfect time to introduce them into our household. It was actually my friend Charlotte who introduced me last year and she took the recipe from previous Great British Bake Off winner Frances Quinn. Frances had shared the idea to her Instagram Stories and it went out into the homes of many. Now it's in our home and I have already had to buy more ingredients for batch number 2!


To be honest, this creation takes no super baking skills, all you need is some pretzels, dark chocolate buttons, a baking tray with a sheet of greaseproof paper (or three in my case) and a bit of time.

How to make your chocolate button pretzels.

Preheat your oven to 150°C to start. Scrunch up your grease proof paper to help it sit flat, a method I have used for some time but one Frances Quinn also suggests.


Lay your buttons out on your tray, fill them up, the buttons don't grow so I found after a few trials you can actually put them closer together than you think, it also means more per tray which you begin to learn is very important!

Then the skill is in melting the button enough so that a pretzel can squish into it but that the button keeps it shape. Around 30 seconds was all they needed until they were shiny and perfectly soft for the pretzel to be added.


Take your tray out and then simply place the pretzels on each individual melted button and leave to set. the setting process takes a bit longer than the prepping process but they are worth it!


If you are like me and only have one good shallow tray, you will find having a few sheets of greaseproof paper pays off: as you pretzel the buttons you can just lift the paper off to leave to cool and then re-cover your tray and start again. I found making a big batch, one tray at a time easier than the thought of multiple trays, melted buttons and not enough hands. However, if you can get some trusty workers in, just keep those trays full and get those hands placing the pretzels on!


They are so delicious and a new family favourite. A simple treat which really works well for family food, party food or even packaged up nicely for foodie gifts!


SHARE:

Thursday 10 December 2020

CREATIVE // How To Make Dried Orange Slices

How To Dry Oranges For Garlands and Christmas Displays


The smell, the colour, their use; dried oranges are a staple for the season and it seems a perfect time to share how I make mine.

You might have seen them popping up on your news feeds and I'm going to show you how I make my own dried orange slices that can be used for all sorts of Christmas decorations. String them up in a garland, place them in a jar, tie them to napkins, dried sliced oranges are just soooo Christmassy!

The joy of this project is that all you really need is a sharp knife, an oven and a bag full of oranges. 

How To Cook The Oranges

You will want to first slice up your oranges as neatly as possible. The slices need to be about 5mm thick but it doesn't really matter, what matters is they are all of similar width so they get an even bake. Then you want to pat them dry and place them on a cooling rack. You then have to place the cooling rack on a tray so the hot air can circulate around the oranges. If they are sat flat on a tray they will stay too moist and not dry out.


You will want to have your oven set at about 130°C and when up to temperature you can pop your trays of slices in. I find you need to turn them every half hour (ish) for about 3 hours. You will see as they dry that they darken in colour and you will be able to tell when they are done. It's a great thing to have in the oven as you decorate the house or if you are just pottering, they let off a delicious sweet smell and making them just feels so chrismassy. 


Once cooled these slices will look beautiful in jars on a sideboard, strung onto garlands, used as place settings, or used to decorate special parcels, regardless of how you use them, making these dried orange slices really is a lovely Christmas activity.


SHARE:

Wednesday 9 December 2020

FOOD // An Easy Cinnamon Roll Tray Bake

Cinnamon Roll tray bake, the easy way


A few weeks ago I made a little video of this on Instagram and it went wild. People absolutely loved it so I thought I would just write down a little 'how to' on creating these delicious cinnamon rolls using no baking skills at all.
I know, it is a complete cheat, I did not make the pastry, cinnamon sugar or in fact roll anything. I did mix icing sugar and water but really I don't think you can call me any kind of baker! I do, however, look like a baker when I present a tray of these rolls fresh from the oven but, really, the hard work has already been done for me.

Now and again I love to get a few make your own pastries and find JUS-Rol a great help in providing some "already made in a tin for you to just roll out" products! In all seriousness, they are a good product and you only need to head to their really creative website to get an idea for something to make with some ready roll pastry.

I love their Cinnamon Rolls. They come in a tin, already rolled for you to just slice up and bake. It is such easy prep. time and within half an hour you will have gone from opening the tin to a tray of cooked goods.

This is a real treat for the days you are all at home. I plan to next make then for Christmas morning as with a coffee, fresh cinnamon is a real treat.

How to make your tray bake

First you will want to set your preheat the oven to 180°C.

As far as making goes, all you need to do is slice the roll. I find into 6 is a good size and lay them onto a baking tray already covered in greaseproof paper. I should mention, my tray takes 2 and a half packs of the Jus-Rol cinnamon swirls, 5 lines of three. I think it just becomes one of those things that work out as you go, but for a starting point I started with 3 packs of rolls with the thought that I could just freeze any that didn't fit in the tray and save for the next time. 


Make sure they are touching as when they bake they join and you get that lovely batch look.
Now the packaging suggests around 15 minutes for bake time but because you are baking with the buns stuffed together I find they need longer. I bake mine for about 20-25 minutes watching that the top keeps golden but the buns are thoroughly baked. 


Whilst the buns are in the oven, I mixed up the pot of icing sugar that comes in the pack with some more of my own, at least double because I like them drenched in icing to give you that real sticky finger experience. I make a runny icing that pours wells over the top.


Once the buns are ready, take them out of the oven and cover in icing straight away so that it melts into any gaps. Then serve as quickly as possible.


These are an absolute treat, one of my faves.

SHARE:
Blogger Template Created by pipdig