
You will know by now that we have been doing up our kitchen, and by the term 'we've' I mean Rob and I (OK, mainly Rob) have totally revamped what was our old, council house kitchen. The reason I mention that it was council house, is because I think it makes a difference in explaining the standard of what we had. We have lived with the kitchen for over 7 years now and it has done us very well. It was always clean, with no damage to it and when we first moved in we had money to spend on other things and the kitchen, as its quality was fine, was not something that we needed to spend money on. Now that time has passed though and the rest of the house is looking great it only seems fair that it gets its fair share of love and we wanted to update it nicely to fit in with the current trends that seemed to suit us. The green had to go.
A few things I want to point out before I start sharing is quite important to what we have done. We have not got the money to buy a re-fitted kitchen. This project was very much about having a bit of 'spare' cash that we could use to update the kitchen. Therefore the research we did into finding the right things at the best price possible was paramount to being able to create this look. That is my first bit of advice to you. Research. Research the look you want to create. Research prices before you start. Research how you want the finished pieces to look so that you know exactly what you are doing and so that no money is wasted on buying the wrong/unneeded thing.
I was told by our neighbours that this kitchen was fitted over 10 years ago. It was barely used by the owner who did a runner after getting into debt. By the time the bank took control of the house and put it on the market as a repossession, the house had lay dormant for over a year with little movement inside. Once we got in the house and cleaned everywhere (many times) we found that the kitchen was the only room that needed very little doing to it. It had no damage, no marks, maybe even no use? So after painting the walls white, there was very little that has changed to it in the past 7.5 years we have lived here.

The kitchen itself was laid out as you imagined; pretty simple with gaps for appliances. We filled them and carried on. An early addition into the kitchen was the removal of some units where we then placed a pretty welsh dresser. That was a sign of my longing for a country house but as time moved on style and tastes changed and now seemed the right time to pass it on to someone else.
I was all for everything new. New cupboard doors, especially as what we had was that plastic coated, totally smooth look which I believed would never paint in a million years, but researcher Roberto found some amazing (but expensive) primer that stated it could be painted on anything and have anything painted on top. We purchased our tin of Zinsser B.I.N and used mini foam rollers. I got to work on painting the cupboards to bring them up to date. I did three layers of primer and then three layers of our beloved Ronseal Diamond Hard Floor Paint. This is the best paint ever. For wood it leaves a beautiful sheen finish, so I knew for our kitchen cupboards it would be perfect. I didn't want a matt paint as that would soak up grease and dirt. I wanted something that has a sheen so it can be wipeable and this is perfect! I think after only a few days of the cupboards being fixed back on Rob spilt a whole thing of gravy down the front on one. It wiped off perfectly, no damage, no stains, and still bright white.
You must roller them as well. I can't stress that enough. These mini foam rollers are so cheap and they give a perfect finish. Paint brushes would ruin this but the roller allows for a completely even coat and it makes all the difference.


Once complete the cupboard doors have fooled everyone who has seen them into thinking they are new. Another trick to really make them look properly new was that painting the visible sides of the cupboard units in the same way. Because the finish is the same on both the doors/sides/underneath it makes the whole unit look new.
The biggest expense in this was the worktop and splashback. As part of creating a visual tricking for making a room look bigger you need to create a big open illusion and using the same worktop and splashback does this. Instead of having tiles which stops the eye dues to the difference in colour we opted to trick the eye and create this non stop effect from top to wall and it really works. It makes the room feel taller and more open.
Our work surfaces and splashback were from B&Q and they were the VENETO worktop and VENETO splashback but you will also need the VENETO edging tape to finish any visible cut edges.
I don't feel like I can talk about installation. Robert is very able when it comes to this and even he found it difficult, so I thought that instead of telling you how to do it (it is kind of obvious, replacing the old) I though I would list the tools that you WILL need to be able to do something like this yourself. Trust me they make it easier:
Drill
Screwdrivers
Hand saw
Planer & circular saw
Jigsaw
File
Sander/Sandpaper
Spirit levels
Stanley knife
Silicone gun

The finished result is amazing and once the visible edges had the tape on (which you will need to buy and adhesive) it really looked complete. One extra thing I just want to point out is that we used the worktop to also cover the edge of our unit. When you walk into the kitchen you are immediately greeted with unit so we actually have placed a sheet of the marble vertically making a brilliant illusion of continuation right from the floor and up onto the worktop. It flows brilliantly.

In the midst of setting worktop in we had made specific alterations to allow us to fit splash back with as little fuss as possible. We lifted the remaining kitchen cupboards to the ceiling to make the walls look taller and to give us the most space possible . It also gets rid of the dust shelf that you get in the empty space between cupboard and ceiling. It means you need a stool to reach the top shelf but we have arranged the cupboards so that the top shelf is filled with rarely used items. We also added an extra cupboard to the corner for shelves to use as much of what we had a possible.


This is another great trick for making more space and allowing that illusion of continuity to make the space look bigger. We placed the splashback behind our cooker and across our windowsill. We also used it to box in some water pipers that ran from ceiling to floor. I would have really liked to buy an inbuilt cooker, something new and fancy but again, to save money we have just made our old cooker look better. Seriously, by putting the splashback behind it you barely notice it and as it is also white, it just blends in so much more than before. Perfect money saving opportunity.
Before I mention our last big change I just wanted to talk about how we repositioned cupboards we already had. Like I said earlier, we have got rid of the Welsh dresser we had and we moved some cupboards from one side of the room to the other to sit where the unit was. This has given us more work surface space that we didn't have before, and we have been able to reuse all the old fixtures from the kitchen having just rearranged them.


Our other trickiest installation was the sink, This was another great money saving find as I wanted the classic white ceramic sink and Rob didn't want one due to the fact that when you drop something in one it breaks. I didn't mind that. It was the look I wanted but I was happy to go through with Rob's plastic sink idea even though I had no faith in it looking good at all! But this Astra Cast Sierra 1.0 bowl sink exceeded all my expectations. Not only is it white (I was convinced it would be creamy) it is gorgeous. Honestly, it is a perfect family sink and a great price. The finishing touch however was the gorgeous gold tap that we got from Rob's parents 8 years ago and has sat, forgotten in our shed until now. What a find! These cost money so I had kind of bartered the cheaper sink with getting a more expensive tap (Makes sense in my head) but as we had this gifted one it was another cost that was saved.


The only way to finish the work tops and splashback is investing in silicone and a good gun. Yep! A silicone gun allows you to create a perfect bead around all joining edges to give you a perfect finished join and this is vital. You will want it everywhere you can see any join. We even put it under and above the floating shelf just to get rid of any dark lines. It honestly makes a huge difference.

Our final piece to the kitchen is the new pantry cupboard. I have seen hugely expensive versions of this and knew we would be able to create something similar at a fraction of the price. My biggest want was a cupboard where all appliances could be kept so they were out of sight.
Rob built a made to measure pantry cupboard which now houses all our food, everyday appliances, and occasionally used appliances. This is brilliant. Not only does it have specific shelves to suit our food, like shelves big enough just for cans or cereal boxes, it also has the same work top and splashback as the rest of the kitchen so we have an extra work surface which will be hidden by a door where everything can sit. Our microwave is even in there and as Rob is an electrician, making way for new plugs was no additional difficulty. This whole cupboard needs to be finished with doors but that is another project which I will share soon.
This cupboard however is perfect for a smaller kitchen to allow more space to be made. Where it stands used to have units anyway so we didn't lose or gain space in that way we have just better utilised the space available. This means though that all my other worktops are clear, making the room more open.
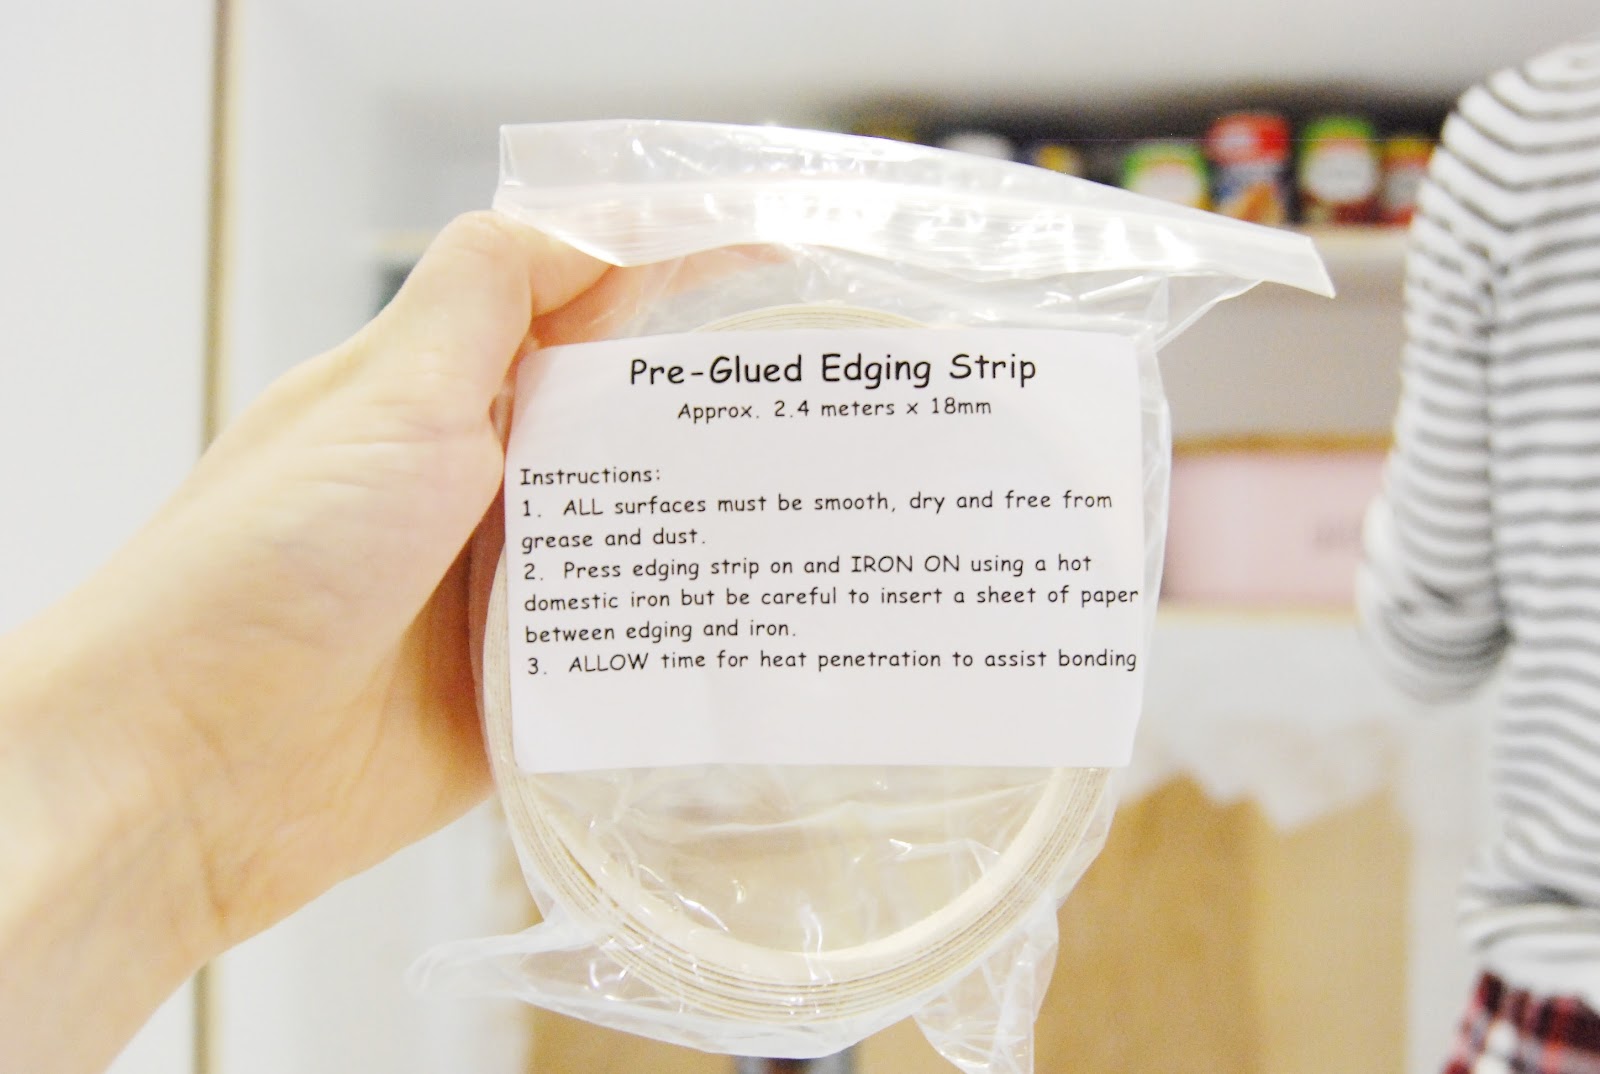
Making the cupboard was as hilarious as you would expect! Rob built it, installed it, realised we had left the bottom two shelves too deep for the doors, dismantled it, re-cut it, rebuilt it and so on. It was fine as we were working in our time so it just took a bit longer, but being able to make the changes easily meant that it wasn't to stressful. We used 18mm plywood which is a relatively cheap wood. It paints well and I just used a wood primer, then our Ronseal paint again, and to hide the edges of the wood Rob got some iron on edging which finishes the wood edge more professionally.
Once we have hung the doors I think we will give it a proper sort so that foods that are regularly needed are easy to get to, but as the idea is shown, its usefulness will be paramount to kitchen life.


And that is everything we have done. Kind of in a nutshell, but also in the longest post I have ever written.
I will share a full reveal post next week. I just wanted to keep them separate so you can get a full idea to the work we have done to make it the way it is.
Emily
I'm seriously impressed by how much difference you've made and all the savings along the way. Hooray for cupboards butting up to the ceiling - I so hate cleaning the tops especially as they're not used for anything. Can't wait to see the full reveal next week. Really interested to see what doors you go for on the pantry cupboard, I always slightly worry about having to essentially stand inside it while making breakfast but the clutter free surfaces appeal massively.
ReplyDeleteBloody marvellous Em! You and I are both very lucky that we both got incredibly handy boys - who can turn their hands to anything. Dickie is the same and it has saved us a fortune over the years. Our kitchen is next on our list too. We've been here for six years and never touched it and it is long outstayed its welcome. It's so ugly!!!! I plan to paint our units white as well - I'll be having a look at the paint you recommended. Really looking forward to seeing the big reveal !!! Well done Rob - it looks amazing!! Cxx
ReplyDelete